There are several ways to secure a woven wrap carry: a double knot, a slip knot, and a ring finish are the most common. A secure double knot works great for a carry that you aren’t going to adjust after you tie it off. If you don’t have a lot of length left in your wrap to tie off a carry, a ring can often be used to finish it instead of a double knot. But often with front and hip carries, it’s great to have the option of easily adjusting the wrap, and that’s where the slip knot is so useful. It can be used to pre-tie a carry and tighten it after baby is in, and a slip knot is awesome when you want to loosen the wrap to lower baby into position to nurse and then tighten baby back up to proper position when finished.
The slip knot can be a bit confusing, but if you follow the trick in the tutorials below, which breaks the slip knot down into 7 easy steps, you’ll have it mastered in no time!
First I have an animated gif. Hopefully it explains itself. 🙂
If you want a straightforward picture tutorial, here are the same 7 steps:
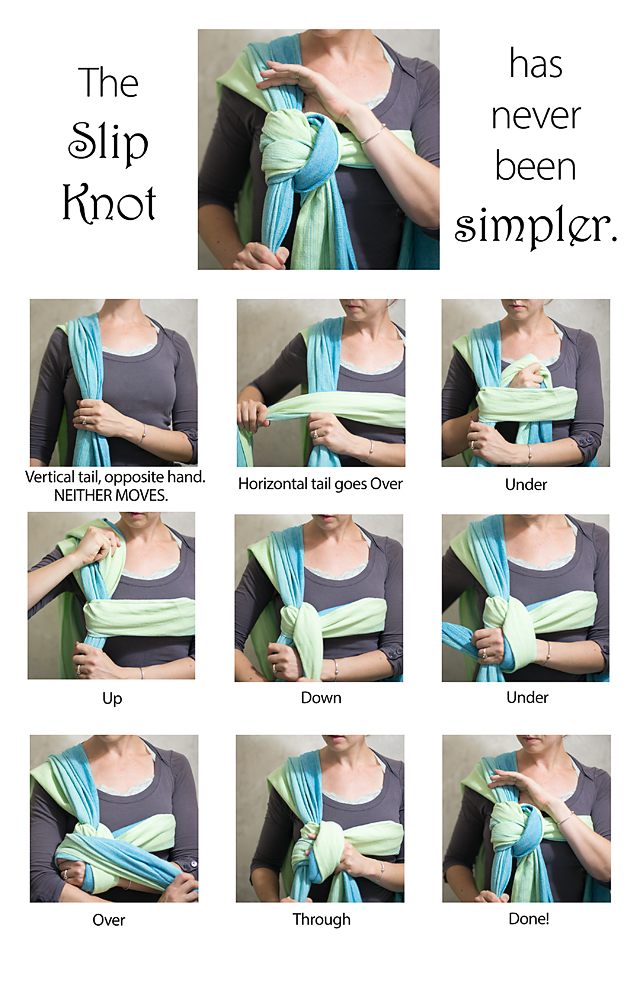
The trick to mastering a slip knot with this method is to remember that the vertical tail coming over the shoulder and the opposite hand holding that tail never move; the entire knot is tied by the horizontal tail moving around the vertical tail.
Now that you’ve mastered a slip knot, check out some carries you can use with it! These woven wrap carries are great for breastfeeding while wearing.
Semi-Front Wrap Cross Carry by Wrapping Rachael
Traditional Sling Carry (fka Rebozo), front or hip by Wrapping Rachael
Inside Out Coolest Hip Cross Carry (CHCC) by Wrap You In Love
Coolest Hip Cross Carry (CHCC) by Babywearing Faith
Did you try it? Does this help? Feel free to ask if you have any questions, and don’t forget you can always post questions and pictures to our Facebook group for help!